Showing posts with label crochet pattern. Show all posts

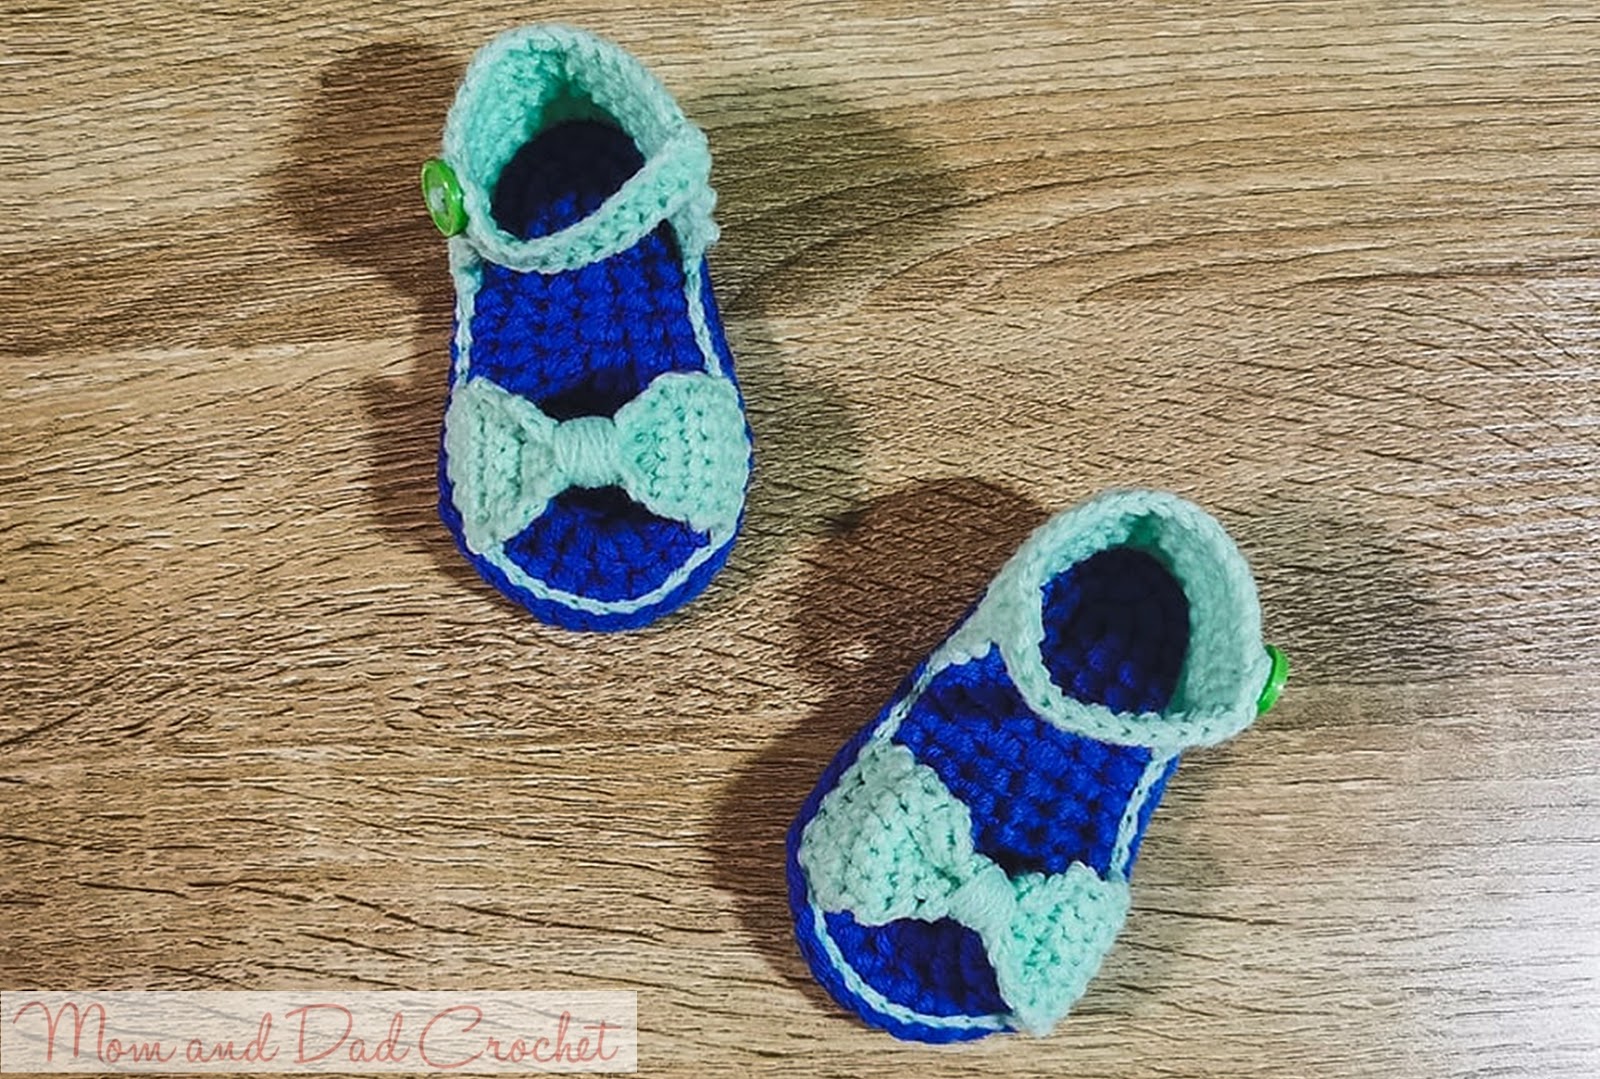
Free Crochet Pattern: Bow Sandals


crochet, crochet free pattern, crochet pattern, crochet sandals bow accent, free crochet pattern, bow sandals, crochet bow sandals, Mom & Dad Crochet,


I just finished another cute pair of sandals for baby and I am sharing the pattern to you.

This blue soled-sandals  with a mint green heel and bow fits a new born or 3-inch foot.

For a larger sole, about 4 or 4.5 inches, you can check the pattern for the Off-White Daisy Sandals.
crochet, crochet free pattern, crochet pattern, crochet sandals bow accent, free crochet pattern, bow sandals, crochet bow sandals, Mom & Dad Crochet,

Materials:
Hook: 4.00mm
Yarn:
Sole- Royal Blue, Indophil acrylic yarn (4-ply)
For the Heel and Bow – Mint green, Indophil acrylic yarn (4-ply)
Green buttons
Tapestry needle for weaving

Abbreviations:
Sc- single crochet
Hdc-half-double crochet
St/s – stich/es

Pattern:
For the sole: You need to use 8-ply of the yarn to make it harder or firmer.
Ch11.
Row 1. 2sc on the 2nd ch from the hook, sc on the next 4 sts, hdc on the next 3 ch, 6 dc on the last st. Working on the other side, hdc on the next 3 sts, sc on the next 4 sts, 2sc on the same ch as the first sc. Sl-st on top of the first sc.
Row 2. Ch1, sc on the same st, 2sc on the next st, sc on the next 4 sts, hdc on the next 4 sts, 2hdc on the next 2 sts, 3hdc on the next st, 2hdc on the next 2 sts, hdc on the next 4 sts, sc on the next 4 sts, 2sc on the nex st, sc on the same st as the first sc, sl-st on top of the first sc.
Row 3. Ch1, sc on the same st, sc on the next st, 2sc on the next  st, sc on the next 9 sts, 2sc on the next st, sc on the next st, 2sc on the next st, 2sc on the next 2sts, sc on the next st, 2sc on the next st, sc on the next st, 2sc in the next st, sc on the next 9 sts, 2sc on the next st, sc on the next 2 sts, sc o the same sts as the first sc, sl-st on top of the first sc. Weave ends.
Make 4 pieces of this sole.

Put together two of each sole.
Facing the wrong side to each other, sl-st all around the side using the mint green yarn. Weave ends.
crochet, crochet free pattern, crochet pattern, crochet sandals bow accent, free crochet pattern, bow sandals, crochet bow sandals, Mom & Dad Crochet,

For the heel:
Using the mint green yarn.
Row 1. From the first st, count 7 sts backwards, ch2 on the post, sc on the next 15 posts. Ch1, turn.
Row 2-8. Sc on the same st, sc on the next sts, across, ch1, turn.
Weave ends.

For the strap:
Connect the mint green yarn on the last st on the top row.
Make ch15, dc on the 5th ch from the hook, dc on the next 9 sts. Weave ends. Put button on the opposite side.
Do this on the other pair working on the other side.
crochet, crochet free pattern, crochet pattern, crochet sandals bow accent, free crochet pattern, bow sandals, crochet bow sandals, Mom & Dad Crochet,

For the front bow:
Count 4 sts from the heel.
Row 1. Ch2, sc on the next 5 sts, ch 1, turn.
Row 2-15, Sc on the same st, sc on the next 5 sts, ch1, turn.
Weave ends.
Sew on the other side.
Locate the center and loop over the yarn several times to create a bow.

Happy Crocheting!

Read More »

Free Crochet Pattern: Sandals with Daisy Flower


crochet free pattern, crochet sandals with daisy flower, crochet, crochet pattern, free crochet pattern,

As mentioned in our previous post, this off-white crochet sandals with daisy flower is one our best-sellers item in Momaye Shoppe.

Many are requesting for a pattern of this. After 100 years, I finally got to write the pattern and sharing it for free.
crochet free pattern, crochet sandals with daisy flower, crochet, crochet pattern, free crochet pattern,

I made a step by step pattern with photo to make it easier to follow.
crochet free pattern, crochet sandals with daisy flower, crochet, crochet pattern, free crochet pattern,

The fisnihed product will fit a 4-inch baby foot.

Materials:
Hook: 4.0mm
Yarn:
crochet free pattern, crochet sandals with daisy flower, crochet, crochet pattern, free crochet pattern,

For the sole – Brown, Indophil acrylic yarn (4-ply)
For the flowers and body: Off-white, Indophil Acrylic yarn (4-ply)
Tapestry needle for weaving 

Abbreviations:
Sc- single crochet
Hdc-half-double crochet
Dc – double crochet
St/s – stich/es

Pattern:
For the sole:
You need to use 8-ply of the yarn to make it harder or firmer.
crochet free pattern, crochet sandals with daisy flower, crochet, crochet pattern, free crochet pattern,

Ch13.
Row 1. 2sc on the 2nd ch from the hook, sc on the next 4 sts, hdc on the next 3 ch, dc on the next 3 sts, 6 dc on the last st. Working on the other side, dc on the next 3 ch, hdc on the next 3 ch, sc on the next 4 ch, 2sc on the same ch as the first sc. Sl-st on top of the first sc.

Row 2. Ch1, sc on the same st, 2sc on the next st, sc on the next 4 sts, hdc on the next 7 sts, 2hdc on the next 2 sts, 3hdc on the next st, 2hdc on the next 2 sts, hdc on the next 7 sts, sc on the next 4 sts, 2sc on the nex st, sc on the same st as the first sc, sl-st on top of the first sc.

Row 3. Ch2, hdc on the same st, hdc on the next st, 2hdc on the next  st, hdc on the next 12 sts, 2dc in the next st, dc on the next st, 2dc on the next st, dc on the next st, 2dc on the next 2 sts, dc on the next st, 2dc on the next st, dc on the next st, 2dc on the next st, hdc on the next 12 sts, 2hdc on the next st, hdc o the same sts as the first hdc, sl-st on top of the first hdc. Weave ends.

Make 4 pieces of this sole.
crochet free pattern, crochet sandals with daisy flower, crochet, crochet pattern, free crochet pattern,

Facing the wrong side to each other, put together two soles by sl-st all around the side. Weave ends.
crochet free pattern, crochet sandals with daisy flower, crochet, crochet pattern, free crochet pattern,

For the heel part:
Using the white or off-white yarn (4-ply Indophil yarn).
crochet free pattern, crochet sandals with daisy flower, crochet, crochet pattern, free crochet pattern,

Row 1. From the fist st, count 8sts backwards. Ch2 on the post, hdc on the next 17sts, ch2, turn.
Row 2-6. Hdc on the same st and the next 18 sts, ch2, turn.
Weave ends.
crochet free pattern, crochet sandals with daisy flower, crochet, crochet pattern, free crochet pattern,

For the strap:
Connect the white yarn on the last st on the top row.
crochet free pattern, crochet sandals with daisy flower, crochet, crochet pattern, free crochet pattern,

Make ch15, dc on the 5th ch from the hook, dc on the next 9 sts. Weave ends. Put button on the opposite side.
Do this on the other pair working on the other side.

For the front part:
Count 7 sts from the heel.
crochet free pattern, crochet sandals with daisy flower, crochet, crochet pattern, free crochet pattern,

Make ch5 on the post. Turn yarn into the hook 5 times, *skip 2 sts, insert hook on the post, pull yarn, hook yarn and pull over two loops, repeat this until there are only two loops remaining in the hook**.
Repeat *to ** 5 more times. (Note: The number of loops remain in the hook should be increase by 1 every after doing *to**)

After repeating 5 times, there should be 6 loops in the hook. Pull yarn over all the loops. Do not cut the yarn.
crochet free pattern, crochet sandals with daisy flower, crochet, crochet pattern, free crochet pattern,

Make ch15, dc on the 5th ch from the hook, dc on the next 9 sts. Weave end.
crochet free pattern, crochet sandals with daisy flower, crochet, crochet pattern, free crochet pattern,

Connect this into the strap by making a loop for the strap to be inserted.
crochet free pattern, crochet sandals with daisy flower, crochet, crochet pattern, free crochet pattern,


For the daisy flower:
Make two sets of layer.
crochet free pattern, crochet sandals with daisy flower, crochet, crochet pattern, free crochet pattern,

First layer: Make a magic ring, *ch5, sc on the ring**. Repeat 19 times. Pull the yarn to close the ring. Weave ends.
Second layer: Make a magic ring, *ch10, sc on the ring**. Repeat 19 times. Pull the yarn to close the ring. Weave ends.
Third layer: Make a magic ring, *ch15, sc on the ring**. Repeat 19 times. Pull the yarn to close the ring. Weave ends.
crochet free pattern, crochet sandals with daisy flower, crochet, crochet pattern, free crochet pattern,

Sew the three layers on top of each other with a white button. Place this on top of the front part of the sandals.

Instead of white or off-white, you can use other colors you want.

Happy Crocheting!
Read More »

Crochet Aviator Hat Pattern


Two of Matthew’s classmates celebrated their birthdays last month. We were informed late and had no time buy gifts. Mommy and I made simple crochet aviator hats.


One of our clients requested if we can make the aviator hat in stripe instead of plain. Tassels were also requested on each ear flaps. Here it is:


Here is the pattern for the aviator hat that will fit a 22-inch head circumference.


Materials:
4-ply worsted acrylic yarn, two contrasting colors.
3.75mm or 4.0mm hooks
Tapestry needles for sewing and weaving
Two buttons.

Pattern:
Make a beanie hat first.
Round 1: Ch4, 10 dc in the first ch. Sl-st to the top of ch4.
Round 2: Ch3, dc in the same st as ch3, 2dc in each st around. Sl-st to the top of ch3.
Round 3:  Ch3, dc in the same st as ch3, *dc in the next st, 2dc into the next st. Repeat * around. Sl-st to the top of ch3.
Round 4:  Ch3, dc in the same st as ch3, *dc in the next 2 sts, 2dc into the next st. Repeat * around. Sl-st to the top of ch3.
Round 5:  Ch3, dc in the same st as ch3, *dc in the next 3 sts, 2dc into the next st. Repeat * around. Sl-st to the top of ch3.
Round 6:  Ch3, dc in the same st as ch3, *dc in the next 4 sts, 2dc into the next st. Repeat * around. Sl-st to the top of ch3.
Round 7:  Ch3, dc in the same st as ch3, *dc in the next 5 sts, 2dc into the next st. Repeat * around. Sl-st to the top of ch3.
Round 8:  Ch3, dc in the same st as ch3, *dc in the next 6 sts, 2dc into the next st. Repeat * around. Sl-st to the top of ch3.
Round 9:  Ch3, dc in the same st as ch3, *dc in the next 7 sts, 2dc into the next st. Repeat * around. Sl-st to the top of ch3.
Round 10:  Ch3, dc in the same st as ch3, *dc in the next 8 sts, 2dc into the next st. Repeat * around. Sl-st to the top of ch3.
Rounds 11-20:  Ch3, dc in each st around. Repeat * around. Sl-st to the top of ch3.
Fasten off after round  15 and weave ends using a tapestry needle.

Note:
You can make larger size by adding more rows before round 11 until you reach the desired head circumference. This means increasing the number of dc in between 2dc's.
Hat height can be increased too by adding several rows after row 20.

For the ear flaps:
Count 10 sts from the end of the last row.
Sl-st the yarn and do ch3, dc on the next 14 sts.
Ch3, turn, dc on the same st and each of the next sts. Repeat this step 5 more times.
Fasten off and weave ends.
Do the earflap on the other side.

For the front flap:
Attach the 2nd color on the front loop on the st next to the earflap.
Ch 3, dc on the front loop until the st next on the earflap on the other side.
Ch 3, dc on the same st and on each of the next sts. Repeat this step 8 more times.
Fasten off and weave ends.

Do edging with the 2nd color using hdc on each of the stitches. Fasten off and weave ends.

Flip the front flap and sew the button into each corner.


Happy Crocheting!
Read More »

Snowman Amigurumi


It’s 27 days until Christmas. I think it is not yet late to share this pattern and there are still enough time to make a dozen of this simple snowman amigurumi as ornament for your Christmas Tree.

The Snowman amigurumi is about 3 inches tall.


Snowman amigurumi
  
You will need
White yarn for the body
Black yarn for the hat
Red yarn for the scarf (you may choose other color)
Orange yarn for the nose
Black beads for the eyes
Fiber fill for stuffing
3.75mm hook
Tapestry needles for weaving

Snowman amigurumi

For the snowman, use white yarn
Round 1.Make a magic ring, Ch2, 10 hdc into the ring, sl-st on top of ch2. Pull the yarn to make a circle.
Round 2. Ch2, hdc on the same st, 2hdc in the next sts. Sl-st on top ch2.
Round 3. Ch2, hdc on the same st, *hdc in next st, 2hdc on the next st**. Repeat * to ** around. Sl-st on top of ch2.
Round 4. Ch2, hdc in each st around. Sl-st on top of ch2.
Round 5. Ch2, hdc in each st around. Sl-st on top of ch2.
Round 6. Ch2, *hdc2tog on the same st and the next st, hdc on the next 4 sts**. Repeat *-** until reaching the last st. Sl-st on top Ch2.
Round 7. Ch2, hdc on each st around. Sl-st on top of ch2.
Round 8. Ch2, *hdc2tog on the same st and the next st, hdc on the next 3 sts**. Repeat *-** until reaching the last st. Sl-st on top Ch2.
Round 9. Ch2, *hdc2tog on the same st and the next st, hdc on the next 2 sts**. Repeat *-** until reaching the last st. Sl-st on top Ch2.
Round 10. Ch2, hdc on the same st, *hdc on the next 2 sts, 2hdc on the next st** the next. Repeat *-**around. Sl-st on top of ch2.
Round 11. Round 10. Ch2, hdc on the same st, *hdc on the next 3 sts, 2hdc on the next st** the next. Repeat *-**around. Sl-st on top of ch2.
Round 12. Ch2, hdc on each sts around.
Round 13. Ch2, *hdc2tog on the same st and the next st, hdc on the next 3 sts**. Repeat *-** until reaching the last st. Sl-st on top Ch2.
Stuff using fiber fill.
Rounf 14. Ch2, *hdc2tog around. Repeat until closed.
Fasten off.
Sew black beads as eyes.
Add nose using orange yarn and smiling lips using black yarn.

For the hat, use black yarn
Round 1. Make a magic ring, Ch2, 10 hdc into the ring, sl-st on top of ch2. Pull the yarn to make a circle.
Round 2. Use back loop only. Ch2, hdc in each st. Sl-st on top of ch2.
Round 3. Ch2, hdc in each st around. Sl-st on top of ch2.
Round 4. Ch2, hdc in each st around. Sl-st on top of ch2.
Round 5. Use front loop only. Ch2, hdc on the same st, 2hdc in each st around. Sl-st on top of ch2.
Fasten off. Sew the hat on the head of the snow man.

For the scarf, use red yarn
Ch60. Hdc on 2nd st from the hook. Hdc on each st. Fasten off.

Next to share is a simple snowflakes ornament.

Happy crocheting!
Read More »

Reading Crochet Symbol Chart


I’ve been into crocheting for more than two years now. There are times I can figure how to do it by simply looking at the photo samples. However, if I were to rate myself, I am still 8 out of 10. I still search for patterns online especially for the items very new to me.

Some patterns are in diagram form instead of text ones. So the problem arises because I cannot read such diagrams.

Then I saw this chart:

Crochet Symbol (DMC)

This made me realize that diagram pattern is much simple than text ones. This will also make me create and share patterns here much easier.

The next time I saw patterns like this...

Source: BabyBlog

and this,

Source: Trico and Crochet - madonna mine

and whatever language it is written as long as I have the chart, crocheting will still be fun.


Can you read diagram patterns too?
Read More »