Free Crochet Pattern: Bow Sandals


crochet, crochet free pattern, crochet pattern, crochet sandals bow accent, free crochet pattern, bow sandals, crochet bow sandals, Mom & Dad Crochet,


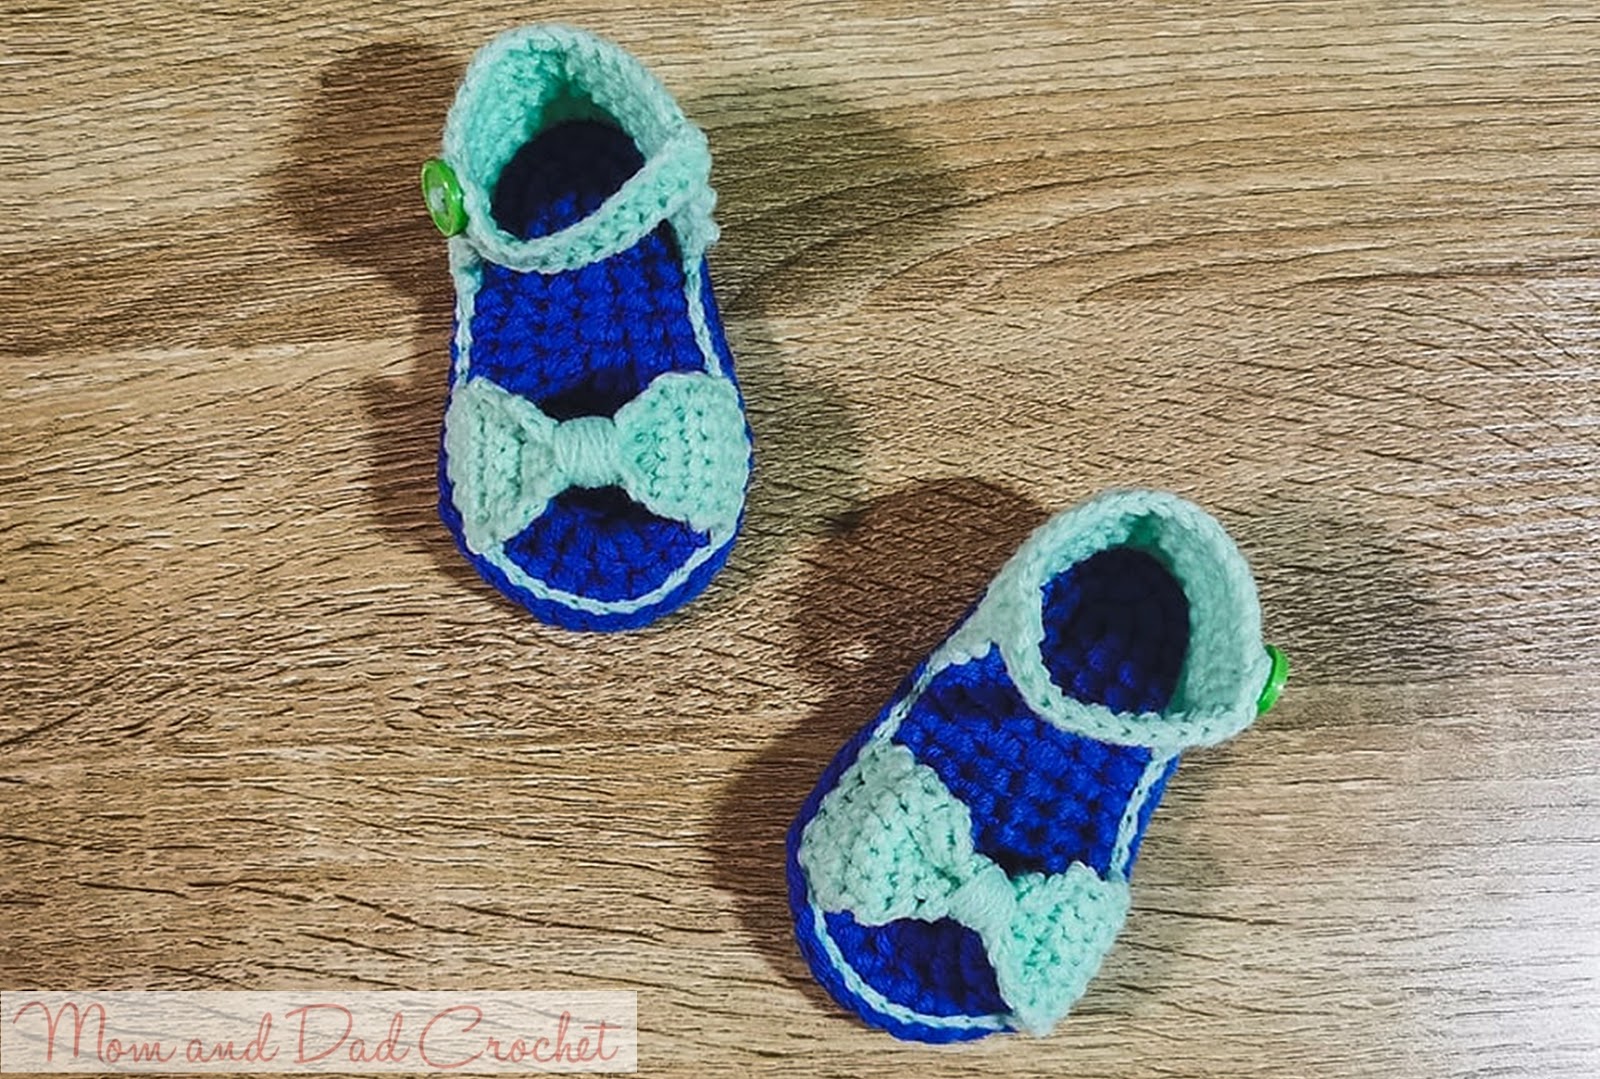
I just finished another cute pair of sandals for baby and I am sharing the pattern to you.

This blue soled-sandals  with a mint green heel and bow fits a new born or 3-inch foot.

For a larger sole, about 4 or 4.5 inches, you can check the pattern for the Off-White Daisy Sandals.
crochet, crochet free pattern, crochet pattern, crochet sandals bow accent, free crochet pattern, bow sandals, crochet bow sandals, Mom & Dad Crochet,

Materials:
Hook: 4.00mm
Yarn:
Sole- Royal Blue, Indophil acrylic yarn (4-ply)
For the Heel and Bow – Mint green, Indophil acrylic yarn (4-ply)
Green buttons
Tapestry needle for weaving

Abbreviations:
Sc- single crochet
Hdc-half-double crochet
St/s – stich/es

Pattern:
For the sole: You need to use 8-ply of the yarn to make it harder or firmer.
Ch11.
Row 1. 2sc on the 2nd ch from the hook, sc on the next 4 sts, hdc on the next 3 ch, 6 dc on the last st. Working on the other side, hdc on the next 3 sts, sc on the next 4 sts, 2sc on the same ch as the first sc. Sl-st on top of the first sc.
Row 2. Ch1, sc on the same st, 2sc on the next st, sc on the next 4 sts, hdc on the next 4 sts, 2hdc on the next 2 sts, 3hdc on the next st, 2hdc on the next 2 sts, hdc on the next 4 sts, sc on the next 4 sts, 2sc on the nex st, sc on the same st as the first sc, sl-st on top of the first sc.
Row 3. Ch1, sc on the same st, sc on the next st, 2sc on the next  st, sc on the next 9 sts, 2sc on the next st, sc on the next st, 2sc on the next st, 2sc on the next 2sts, sc on the next st, 2sc on the next st, sc on the next st, 2sc in the next st, sc on the next 9 sts, 2sc on the next st, sc on the next 2 sts, sc o the same sts as the first sc, sl-st on top of the first sc. Weave ends.
Make 4 pieces of this sole.

Put together two of each sole.
Facing the wrong side to each other, sl-st all around the side using the mint green yarn. Weave ends.
crochet, crochet free pattern, crochet pattern, crochet sandals bow accent, free crochet pattern, bow sandals, crochet bow sandals, Mom & Dad Crochet,

For the heel:
Using the mint green yarn.
Row 1. From the first st, count 7 sts backwards, ch2 on the post, sc on the next 15 posts. Ch1, turn.
Row 2-8. Sc on the same st, sc on the next sts, across, ch1, turn.
Weave ends.

For the strap:
Connect the mint green yarn on the last st on the top row.
Make ch15, dc on the 5th ch from the hook, dc on the next 9 sts. Weave ends. Put button on the opposite side.
Do this on the other pair working on the other side.
crochet, crochet free pattern, crochet pattern, crochet sandals bow accent, free crochet pattern, bow sandals, crochet bow sandals, Mom & Dad Crochet,

For the front bow:
Count 4 sts from the heel.
Row 1. Ch2, sc on the next 5 sts, ch 1, turn.
Row 2-15, Sc on the same st, sc on the next 5 sts, ch1, turn.
Weave ends.
Sew on the other side.
Locate the center and loop over the yarn several times to create a bow.

Happy Crocheting!

Read More »

Free Crochet Pattern: Sandals with Daisy Flower


crochet free pattern, crochet sandals with daisy flower, crochet, crochet pattern, free crochet pattern,

As mentioned in our previous post, this off-white crochet sandals with daisy flower is one our best-sellers item in Momaye Shoppe.

Many are requesting for a pattern of this. After 100 years, I finally got to write the pattern and sharing it for free.
crochet free pattern, crochet sandals with daisy flower, crochet, crochet pattern, free crochet pattern,

I made a step by step pattern with photo to make it easier to follow.
crochet free pattern, crochet sandals with daisy flower, crochet, crochet pattern, free crochet pattern,

The fisnihed product will fit a 4-inch baby foot.

Materials:
Hook: 4.0mm
Yarn:
crochet free pattern, crochet sandals with daisy flower, crochet, crochet pattern, free crochet pattern,

For the sole – Brown, Indophil acrylic yarn (4-ply)
For the flowers and body: Off-white, Indophil Acrylic yarn (4-ply)
Tapestry needle for weaving 

Abbreviations:
Sc- single crochet
Hdc-half-double crochet
Dc – double crochet
St/s – stich/es

Pattern:
For the sole:
You need to use 8-ply of the yarn to make it harder or firmer.
crochet free pattern, crochet sandals with daisy flower, crochet, crochet pattern, free crochet pattern,

Ch13.
Row 1. 2sc on the 2nd ch from the hook, sc on the next 4 sts, hdc on the next 3 ch, dc on the next 3 sts, 6 dc on the last st. Working on the other side, dc on the next 3 ch, hdc on the next 3 ch, sc on the next 4 ch, 2sc on the same ch as the first sc. Sl-st on top of the first sc.

Row 2. Ch1, sc on the same st, 2sc on the next st, sc on the next 4 sts, hdc on the next 7 sts, 2hdc on the next 2 sts, 3hdc on the next st, 2hdc on the next 2 sts, hdc on the next 7 sts, sc on the next 4 sts, 2sc on the nex st, sc on the same st as the first sc, sl-st on top of the first sc.

Row 3. Ch2, hdc on the same st, hdc on the next st, 2hdc on the next  st, hdc on the next 12 sts, 2dc in the next st, dc on the next st, 2dc on the next st, dc on the next st, 2dc on the next 2 sts, dc on the next st, 2dc on the next st, dc on the next st, 2dc on the next st, hdc on the next 12 sts, 2hdc on the next st, hdc o the same sts as the first hdc, sl-st on top of the first hdc. Weave ends.

Make 4 pieces of this sole.
crochet free pattern, crochet sandals with daisy flower, crochet, crochet pattern, free crochet pattern,

Facing the wrong side to each other, put together two soles by sl-st all around the side. Weave ends.
crochet free pattern, crochet sandals with daisy flower, crochet, crochet pattern, free crochet pattern,

For the heel part:
Using the white or off-white yarn (4-ply Indophil yarn).
crochet free pattern, crochet sandals with daisy flower, crochet, crochet pattern, free crochet pattern,

Row 1. From the fist st, count 8sts backwards. Ch2 on the post, hdc on the next 17sts, ch2, turn.
Row 2-6. Hdc on the same st and the next 18 sts, ch2, turn.
Weave ends.
crochet free pattern, crochet sandals with daisy flower, crochet, crochet pattern, free crochet pattern,

For the strap:
Connect the white yarn on the last st on the top row.
crochet free pattern, crochet sandals with daisy flower, crochet, crochet pattern, free crochet pattern,

Make ch15, dc on the 5th ch from the hook, dc on the next 9 sts. Weave ends. Put button on the opposite side.
Do this on the other pair working on the other side.

For the front part:
Count 7 sts from the heel.
crochet free pattern, crochet sandals with daisy flower, crochet, crochet pattern, free crochet pattern,

Make ch5 on the post. Turn yarn into the hook 5 times, *skip 2 sts, insert hook on the post, pull yarn, hook yarn and pull over two loops, repeat this until there are only two loops remaining in the hook**.
Repeat *to ** 5 more times. (Note: The number of loops remain in the hook should be increase by 1 every after doing *to**)

After repeating 5 times, there should be 6 loops in the hook. Pull yarn over all the loops. Do not cut the yarn.
crochet free pattern, crochet sandals with daisy flower, crochet, crochet pattern, free crochet pattern,

Make ch15, dc on the 5th ch from the hook, dc on the next 9 sts. Weave end.
crochet free pattern, crochet sandals with daisy flower, crochet, crochet pattern, free crochet pattern,

Connect this into the strap by making a loop for the strap to be inserted.
crochet free pattern, crochet sandals with daisy flower, crochet, crochet pattern, free crochet pattern,


For the daisy flower:
Make two sets of layer.
crochet free pattern, crochet sandals with daisy flower, crochet, crochet pattern, free crochet pattern,

First layer: Make a magic ring, *ch5, sc on the ring**. Repeat 19 times. Pull the yarn to close the ring. Weave ends.
Second layer: Make a magic ring, *ch10, sc on the ring**. Repeat 19 times. Pull the yarn to close the ring. Weave ends.
Third layer: Make a magic ring, *ch15, sc on the ring**. Repeat 19 times. Pull the yarn to close the ring. Weave ends.
crochet free pattern, crochet sandals with daisy flower, crochet, crochet pattern, free crochet pattern,

Sew the three layers on top of each other with a white button. Place this on top of the front part of the sandals.

Instead of white or off-white, you can use other colors you want.

Happy Crocheting!
Read More »

Free Crochet Pattern: Turban Headband With Top Knot Detail


Here is something to share: a pattern for Turban Headband with a Top Knot Detail.


Sounds complicated but this headband is actually great for beginners. It only uses 1 stitch, the double crochet.

crochet free pattern, Crochet headband, crochet turban, Mom & Dad Crochet, turban headband with top-knot detail,

Creating this headband can only take less than an hour.

crochet free pattern, Crochet headband, crochet turban, Mom & Dad Crochet, turban headband with top-knot detail,

The pattern is good for a turban or headband for babies with head circumference of 14-15 inches.

Adding the number of chains in the first row will increase the size.

Abbreviations:
st - stitch
sts - stitches
ch - chain
sc - single crochet
dc - double crochet 

Hook:
3.75mm or 4.00mm

Yarn:
4-ply acryclic yarn

Pattern:

For the Headband:
Make ch70.
Row 1. Dc in the 3rd ch from the hook, dc on the remaining chains. ch3, turn.
Row 3-5. Dc on the same st as ch3, dc across all the sts. ch3, turn.
Row 6. Dc on the same st as ch3, dc across all the sts. ch1.
Make sc accross all sides of the head band. Sl-st and weave ends.
Connect both ends by stitching using tapestry needle.
crochet free pattern, Crochet headband, crochet turban, Mom & Dad Crochet, turban headband with top-knot detail,

For the top knot detail:
Make ch12.
Row 1. Dc in the 3rd ch from the hook, dc on the remaining chains. ch3, turn.
Row 2. Dc on the same st as ch3, dc across all the sts. Sl-st.
Wrap it around the headband and connect both ends to create a ribbon-like knot. Weave ends.

Read More »

Free Crochet Pattern: Slouchy Spiral Beanie Hat


Slouchy Spiral Beanie Hat. free crochet pattern, crochet slouchy hat, crochet slouchy hat pattern, Mom & Dad Crochet, crochet, slouchy spiral crochet hat,

I tried making a crochet beanie hat. This time, I tried making accent on a regular beanie hat by having a spiral design.

Slouchy Spiral Beanie Hat. free crochet pattern, crochet slouchy hat, crochet slouchy hat pattern, Mom & Dad Crochet, crochet, slouchy spiral crochet hat,

I made this hat for me but when our little boy saw the finished product, he asked me to make another one for him.

This fits a 22-24 inches head circumference.

The pattern seems to be complicated but once you started seeing the spiral accent, you will never stop until you finished it.

Slouchy Spiral Beanie Hat. free crochet pattern, crochet slouchy hat, crochet slouchy hat pattern, Mom & Dad Crochet, crochet, slouchy spiral crochet hat,

Materials:

Hook 4.0mm
Worsted yarn. color of your choice
Tapestry needle

Special stitch used: fpdc - front post double crochet

Start wit Chain 4, sl st to first ch


Row 1: Ch 3 (counts as first dc), 10 dc into ring

Row 2:  Ch3, *fpdc (yarn over and insert your hook from front to back between the posts of first and second double crochet of the first row) in the next dc of the first row, dc on the next st**. Repeat * to **. Sl-st on top of ch3.

Row 3:  Ch3, *fpdc in the fpdc of the previous row, dc on the next 2 sts**. Repeat * to **. Sl-st on top of ch3.

Row 4:  Ch3, *fpdc in the fpdc of the previous row, dc on the next 3 st**. Repeat * to **. Sl-st on top of ch3.

Row 5:  Ch3, *fpdc in the fpdc of the previous row, dc on the next 4 st**. Repeat * to **. Sl-st on top of ch3.

Row 6:  Ch3, *fpdc in the fpdc of the previous row, dc on the next 5 st**. Repeat * to **. Sl-st on top of ch3.

Row 7:  Ch3, *fpdc in the fpdc of the previous row, dc on the next 6 st**. Repeat * to **. Sl-st on top of ch3.

Row 8:  Ch3, *fpdc in the fpdc of the previous row, dc on the next 7 st**. Repeat * to **. Sl-st on top of ch3.

Row 9:  Ch3, *fpdc in the fpdc of the previous row, dc on the next 8 st**. Repeat * to **. Sl-st on top of ch3.

Row 10:  Ch3, *fpdc in the fpdc of the previous row, dc on the next 9 st**. Repeat * to **. Sl-st on top of ch3.

Row 11-32:  Ch3, *fpdc in the fpdc of the previous row, dc on the next 10 st**. Repeat * to **. Sl-st on top of ch3. (You can add more rows depending on how slouchy you wanted your hat is.)

Row 33-35:  Ch2, hdc in each st. Sl-st on top of hdc.

Tie off and weave in ends using tapestry needle.

Slouchy Spiral Beanie Hat. free crochet pattern, crochet slouchy hat, crochet slouchy hat pattern, Mom & Dad Crochet, crochet, slouchy spiral crochet hat,

Happy Crocheting!


Read More »

Free Crochet Pattern: Crochet Minnie Mouse Headband


It has been a while since this blog was updated. Mommy and I were busy with other stuff not only at work but at home as well.

This time, I will share a simple crochet item that you can use as gift especially fan girl of Disney.

Mom & Dad Crochet, crochet headband, Minnie Mouse, crochet minnie mouse headband,

Materials:

Plastic Headband
black yarn
pink or red yarn
hook, 4mm
tapesry needle.

For the headband:


1. Make ch7 (number of chain can be reduced or increased depending on the width of the headband), dc on the 3rd ch from the hook, dc on the remaining next ch, make 3 ch on the last ch.
2. Work dc on the other side and make a continuous dc until you have the length of the headband.
3. Insert the headband and close it with a sl-st. Weave ends.

Mom & Dad Crochet, crochet headband, Minnie Mouse, crochet minnie mouse headband,

For the ears, you need to make 4 pieces.

First row: Make a magic ring. Ch3, 10dc on the loop. Sl-st on top of ch3.
2nd row: Ch3, dc on the same st, 2dc on each st. Sl-st on top of ch3
3rd row: Ch3, dc on the same st, *2dc on the nex st, dc on the next st**, repeat * to **, sl-st on top of ch3.

Weave ends using needle.

You can add more rows depending on the size of the ears you wanted.

Attach the other circle and sew the sides to make it firm. This will make the first ear.

Attach each ear on the head band by sewing using tapestry needles.

Mom & Dad Crochet, crochet headband, Minnie Mouse, crochet minnie mouse headband,

For the ribbon.

1. Ch13, dc on the 3rd ch from the hook, dc on the next until the last ch.
2. Ch3, turn. *Dc on each space until the end, ch3, turn.
Repeat * until you get the right length.
3. Attach both ends by sewing using tapestry needle.
4. Find the center and wrap it with the same color of yarn.
5. Sew in the headband with the ears.

Mom & Dad Crochet, crochet headband, Minnie Mouse, crochet minnie mouse headband,

Happy crocheting!
Read More »